Network Camera Person Detector – With a Twist!

At my home I have 4 Ubiquiti Security cameras around the outside of my home (plus a few inside as well). I chose Ubiquiti because they do not need to be cloud connected as I would prefer to keep as much my video within my home as possible. While the video quality was nice, I found the motion detection to be severely lacking. I was constantly being alerted every time the wind blew, or sometimes when a cloud would move across the sky. I was getting so many alerts that I stopped looking altogether.
When the 2020 Pandemic started I decided to make a home project which would allow me to get person alerts, rather than motion alerts. Since I already had a home Raspberry Pi Kubernetes lab I figured that would be a perfect place to get this going.
To begin I had to enable the RTSP stream on my outdoor cameras

Setting up OpenCV
The next, rather obnoxious challenge was creating an OpenCV docker
container which I could use to grab frames from the RTSP stream. After waiting for 18 hours for OpenCV to build, I finally had a container. Only after building the docker image did I learn about buildx. This is allows me to use my much more powerful desktop to do the building, which cuts the time needed down to basically a few minutes (yes, it still takes time).
Once I had a base container with OpenCV it was time for me to do some detecting. I made a docker image with OpenCV and Tensorflow and began doing some basic tests with a single camera. I quickly learned that OpenCV doesn’t play well with RTSP out of the box. Fortunately after many google searches I found a good solution, which I adapted for my purposes. I then had to limit the FPS, as the cameras are only streaming at 15 FPS. Pulling any more than 15FPS would result in me seeing the same frame multiple times. Fortunately Josh on stack overflow had a good solution to that problem as well.
After some preliminary testing I was able to get a pi to detect people, but I noticed that it couldn’t run detection fast enough to handle real time. I was averaging at best, 3 or 4FPS. Which would translate to 1 frame per camera, per second. Fortunately Google has a working and affordable USB Accelerator. This accelerator is the key to real-time detection.
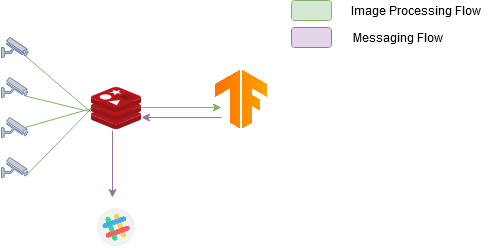
The setup I am currently running involves one pod with OpenCV and another with the EdgeTPU software installed.
- Redis
- OpenCV Pod to retrieve frames from cameras (1 per camera)
- Object detection, tagged to node with the Edge TPU
- Messenger to send messages to slack
Raspberry Pis have very limited compute power, so I decided to actually use my Kubernetes cluster. After careful thought, I decided Redis Streams was the way to go. This is a less than conventional use case for Redis streams, but I have been running it for a while now and it is running solid without taxing the system.
As stated before, I have 1 pod per camera, each camera frame is captured and added to a Redis stream with the camera name attached. My main consumer pod will then listen to the stream, grab the frame and details, then add it to a thread which will then be consumed by my main person detection class. Drawing boxes on the images didn’t prove to be a challenge so I keep that on the same machine, but I could easily break that out and run it on a separate pod as well.

Once people are detected and the boxes are drawn, the image is placed in a message queue where my message listeners will pick it up and send me a message in slack with the frame and color coded boxes drawn. Obviously getting a message for each frame a person was detected would be a bit much. To solve this issue, I create an expiring key with the camera name. So I only receive one image per camera. As long as the camera’s key hasn’t expired I will not receive any more messages from that camera, while continuing to receive messages from the others.

Edge TPU
Accessing the Edge TPU through Kubernetes proved to be a small challenge. This setup as it stands poses a slight security risk as the container needs to be run privileged. I currently have 2 accelerators plugged into the same device. The other accelerator is being used for experimentation, so I needed a way to ensure I didn’t run into device conflicts. I have mapped the USB devices to the container, unfortunately, the container can see all USB devices, so I have to specify the device being used through the app itself.
# Deployment Yaml
containers:
        ...
          volumeMounts:
            - mountPath: /dev/bus/usb/002/005
              name: edgetpu
          securityContext:
            privileged: true
      volumes:
        - name: edgetpu
          hostPath:
            path: /dev/bus/usb/002/005
#Python code
DETECTION_MODEL = "/app/model/custom_model.tflite"
DETECTION_DEVICE = "/sys/bus/usb/devices/2-1"
engine = DetectionEngine(DETECTION_MODEL, DETECTION_DEVICE)Slack API
If you are going to interact with Slack, do yourself a favor and avoid their Python API. For some reason the only way to send an image/attachment in a message is by browsing to a file on the local filesystem. There is an option to attach a binary file form memory, but it is hard coded as text/plain. In the end, using the REST API works well enough using requests. I write the image to BytesIO and retrieve the file from there.
 requests.post(
        'https://slack.com/api/files.upload',
        data={
            'token': SLACK_TOKEN,
            'channels': ["#detection"],
            'title': '{} Detected Image'.format(camera)},
        files={
            'file': (
                '{}_detected.jpeg'.format(camera),
                bytebuffer.getvalue(),
                'jpeg')})
Advantages of running in Kubernetes
I have a full CI/CD pipeline in my home network running GitLab CE, I am able to make changes to my code and it automatically checks the code and deployed to my Pi Kubernetes.

The next big advantage I have is the ability to configure the code through Environment variables. Some of which are automatically configured, like my Redis server. Since it is a Kubernetes service, the connection information is made available to the pods automatically.
Secrets are much easier to maintain. Out of the box Kubernetes handles secrets very easily. Any time I need a password or certificate I put it in a Kubernetes secret. (I will be moving to Vault by HashiCorp soon).
In summary, Kubernetes is extremely flexible, and ridiculously scalable. I have no problems running this setup on my Pi cluster and could easily scale this up to run on the edge in an enterprise environment.
Current Issues
As stated earlier, I must run my pods as privileged in order to access the USB device. Ideally it would be nice to only grant permission to the USB device itself, rather than having to give the pod full reign on the system.
volumeMounts:
            - mountPath: /dev/bus/usb/002/005
              name: edgetpu
          securityContext:
            privileged: true
      volumes:
        - name: edgetpu
          hostPath:
            path: /dev/bus/usb/002/005
The other strange issue, is the USB device itself seems to change without reason, which is a problem since the device is hard coded. I need to find a solution which will follow the device as it moves as I want to run multiple Edge TPUs for different purposes on the same system. After doing some digging through the Coral API, I noticed they have methods to see unassigned devices, unfortunately it seems to show the device as unassigned even when it’s in use. I assume this is because they are expecting the code to be run in the same python app rather than separate apps.
Lesson Learned
This was my first time using Redis streams, and while it didn’t take too long to get it up and running, I didn’t realize you must ACK the message, even if you delete it. It took me a while to figure out why my Redis server kept being killed for OOM when the queue size was holding steady at 0. Once I logged into the server and saw that the pending message queue was ridiculously large, I added ACK before I delete the message and now Redis is running smooth with no memory issues.
Code
I have added most of the code needed to make this work to my Github. Please take a look. Pull requests are welcome.

Recent Comments